Southampton Historic Cemeteries Treatment Demonstrations
Prepared by: Architectural Conservation Laboratory and Research Center University of Pennsylvania, 2006
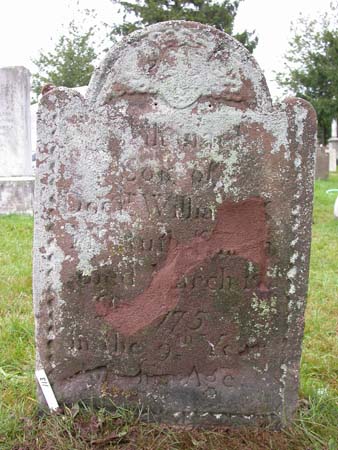
CemPlotID: 130 Smith, William
Date(s):10/1/2004 10/10/2004
Supervising Conservator: Frank G. Matero Conservator: John Glavin, Amanda Thomas

Treatment Report: Pretreatment condition: diagonal break at the midpoint of the marker and a vertical break near the base of the marker.
Summary of treatment: Stub of the marker was removed from the ground. All three fragments were cleaned with water and detergent using a nylon brush. A poultice containing a 5% solution of calcium hypochlorite was applied with a dwell time of 1 hour before rinsing with water. Fragments were reattached with epoxy and threaded stainless steel 316 pins (3/8" dia. / 3" length) Each break was pinned with 5 pins embedded 1 ." into 1/4" diameter drilled holes on each fragment spaced approximately 4 ." apart and 2" from the left and right edge. Pins were seated in Sikadur 31 epoxy paste adhesive with spot welds of adhesive applied along the fragment surfaces. After reattachment the joint of the midpoint break was patched with a pigmented mortar (1 white cement : 1 hydrated lime : 2 marble powder).
CemPlotID: 136 Cooper, Hannah & Ellias
Date(s): 10/1/2004 10/10/2004
Supervising Conservator: Frank G. Matero Conservator: John Glavin, Amanda Thomas
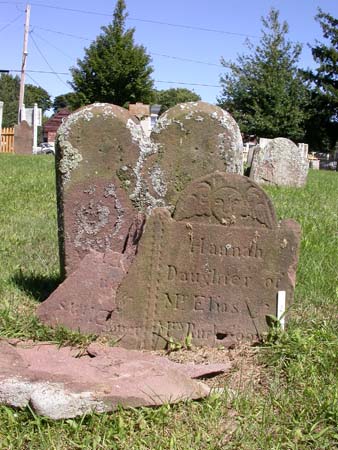
Treatment Report: Pretreatment condition: Detachment of upper lefthand corner of marker. Additional small fragments; 3 of surface delamination, 2 interior fragments comprising the thickness of the break. Summary of treatment: Marker was removed from ground. Detached segment and fragments were cleaned with water and detergent using a nylon brush. Fragments of surface delamination were consolidated with Conservare OH-100. Re-adhered interior fragments with spot welds of Sikadur 31 epoxy paste adhesive, then reattached fragments to segment, also with epoxy. Segment was reattached to the larger part of the marker with spot welds of Sikadur 31 epoxy paste adhesive and 3 threaded Delrin pins (3/16" dia. / various lengths) seated in acrylic emulsion adhesive (Rhoplex MC-76 / 1950 : Acrysol ASE60 : calcium carbonate: glass microspheres). Marker was cleaned with D-2 Architectural Biocide and bronze bristle brushes. The voids were then injected with water to pre- wet the interior surfaces and followed thereafter with an injection of 10% solution El Rey and grout. The
grout consisted of a dry mix of one part fine silica sand less than 300.m in size, one part Zeelan 3M ceramic microspheres and two parts hydrated hydraulic lime. This was then mixed with one part dry to one part 10% solution El Rey in water. The injection was done through a 10 gauge steel cannula. The surface fragments were then reattached to the marker with a barrier of B-72 consolidant and spot welds of Sikadur 31 epoxy paste adhesive.
CemPlotID: 2 White, George
10/8/2004 10/10/2004
Supervising Conservator: Frank G. Matero Conservator:Lyles McBratney
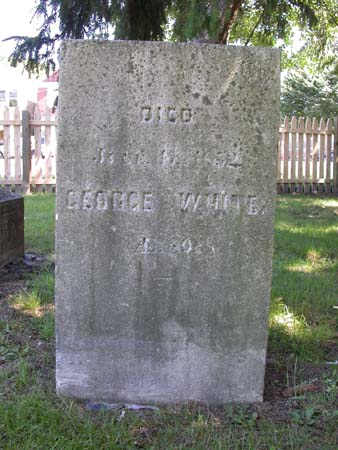
Treatment Report:
The marble was first rinsed with water and cleaned with a soft natural bristle brush, starting from bottom up to loosen the bio-growth and remove any superficial soiling. Small wooden sticks were used to remove bio-growth in the recessed surfaces. The stones were rinsed and then cleaned with D2 (2 parts water: 1 part D2) using a soft bristle, starting from the bottom up. The surface was again rinse with water to remove any residue. The cleaning worked fairly well in removing the surface bio-growth and soiling. There were still areas of mold on the surface and some green staining due to bio-growth still visible. The backs of the primary marker and the foot stone were not totally accessible for cleaning due to their positions.
CemPlotID: 3 White, George W., Ruth, Mehetable
10/8/2004 10/10/2004
Supervising Conservator: Frank G. Matero Conservator: Valerie Gomez
Treatment Report:
The marble was first rinsed with water and cleaned with a soft natural bristle brush, starting from bottom up to loosen the bio-growth and remove any superficial soiling. Small wooden sticks were used to remove bio-growth in the recessed surfaces. The stones were rinsed and then cleaned with D2 (2 parts water: 1 part D2) using a soft bristle, starting from the bottom up. The surface was again rinse with water to remove any residue. The cleaning worked fairly well in removing the surface bio-growth and soiling. There were still areas of mold on the surface and some green staining due to bio-growth still visible. The backs of the primary marker and the foot stone were not totally accessible for cleaning due to their positions.
CemPlotID: 4 King
10/8/2004 10/10/2004
Supervising Conservator:Frank G. Matero Conservator: Wanda Lopez-Bobonis
Treatment Report:
The marble was first rinsed with water and cleaned with a soft natural bristle brush, starting from bottom up to loosen the bio-growth and remove any superficial soiling. Small wooden sticks were used to remove bio-growth in the recessed surfaces. The stones were rinsed and then cleaned with D2 (2 parts water: 1 part D2) using a soft bristle, starting from the bottom up. The surface was again rinse with water to remove any residue. The cleaning worked fairly well in removing the surface bio-growth and soiling. There were still areas of mold on the surface and some green staining due to bio-growth still visible. The backs of the primary marker and the foot stone were not totally accessible for cleaning due to their positions.
CemPlotID: 8 White, Ann F.
10/8/2004 10/10/2004
Supervising Conservator: Frank G. Matero Conservator: Jennifer Correia
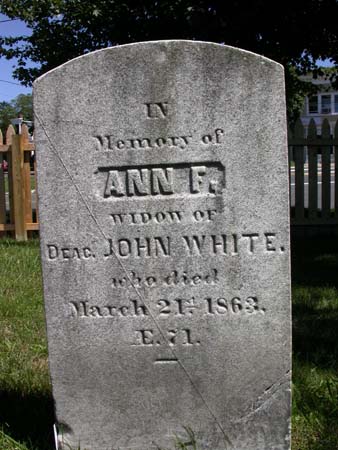
Treatment Report: The marble was first rinsed with water and cleaned with a soft natural bristle brush, starting from bottom up to loosen the bio-growth and remove any superficial soiling. Small wooden sticks were used to remove bio-growth in the recessed surfaces. The stones were rinsed and then cleaned with D2 (2 parts water: 1 part D2) using a soft bristle, starting from the bottom up. The surface was again rinse with water to remove any residue. The cleaning worked fairly well in removing the surface bio-growth and soiling. There were still areas of mold on the surface and some green staining due to bio-growth still visible. The backs of the primary marker and the foot stone were not totally accessible for cleaning due to their positions.
CemPlotID: 30 Pelletreau, Nathaniel
10/8/2004 10/10/2004
Supervising Conservator: Frank G. Matero Conservator: Victoria Pingarron Alvarez
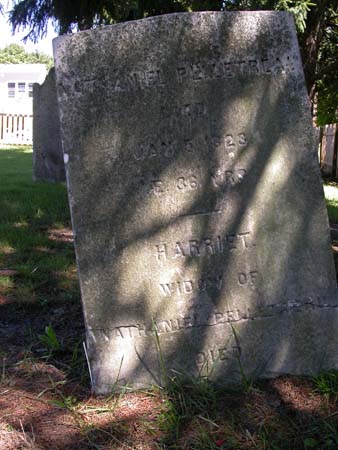
Treatment Report:
Treatment: I worked on the slanted marble stone situated under the pine tree close to North Main Street, directly next to the tree and picket fence. Before I began it was almost black/green with biogrowth and dirt. I first used water and the natural bristle brush on the back, sides, front, and top always starting from the bottom up. Then, I used AMMONIA (from the blue bucket, sorry did not know the %) with synthetic bristle toothbrushes to clean rinsing often with water. Using the toothbrush took much longer, but cleaned to greater effect. Also, I allowed the ammonia a few minutes of dwell time. Working in small sections allowed me to keep the clean sections uniform. The stone appears to be tilted due to root growth from the tree. Also, stone is embedded further into soil than originally intended, as the last line of the front of the stone is half covered in soil and pine needles. Used skewers and tongue depressors to scrape biogrowth from from of stone that was particularly well- adhered to surface, especially on the front of the stone. I did not complete cleaning with ammonia on the front and top of stone, but do not know if someone finished it later that day or on Sunday. Before I left the cemetery, I rinsed the stone well to remove as much of the detergent as possible. Crack in stone appears to have been repaired some time ago but seems stable and solid, did not notice any movement at all while cleaning.
CemPlotID: 31 Wright, Jane
10/8/2004 10/10/2004
Supervising Conservator: Frank G. Matero Conservator: Kelly Wong
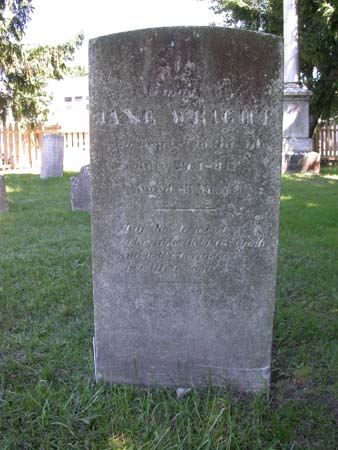
Treatment Report: I worked from the back-side of the tombstone to the front. And scrubbed from bottom up, rinsing with water between scrubbings. Step 1: Cleaning I began by watering down the tombstone with the spray hose in preparation of cleaning. Using a soft synthetic brush, I scrubbed the tombstone with medium pressure to remove the dirt and grime. This made a tremendous difference in the appearance and revealed a pinkish tint to the white marble I hadn't anticipated. Step 2: Chemical Treatment Using a cleaner (detergent + 5% ammonia), I scrubbed the left half of the back side, bottom up. Rinsing thoroughly with water after each area of scrubbing. On the right half, I cleaned with D/2 Architectural Biocide, scrubbing in the same method. A thorough rinse with water was also applied after using the D/2. Note: this was only the "back-side" of the tombstone. On the front of the tombstone, the cleaning was the same. The treatment was different. I only used the ammonia solution for chemical treatment for the entire front-side. I also used a toothbrush for reaching into the carved/recessed inscriptions. In my opinion, the ammonia solution worked better at removing the dirt and stains from biological growth than the D/2 Architectural Biocide. All surfaces (front, back, two sides, and top) were cleaned and treated.
CemPlotID: 32 Rhodes, Emeline
10/8/2004 10/10/2004
Supervising Conservator: Frank G. Matero Conservator: Frances Ford
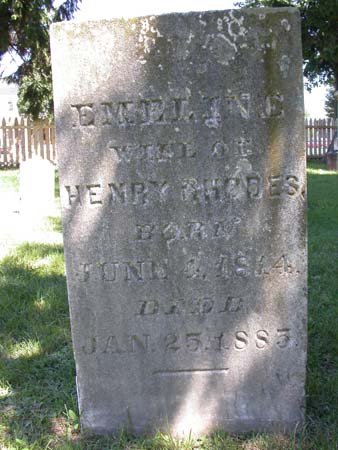
Treatment Report:I began cleaning with the soft brush and water from the hose, working from the bottom up. Working from back to front. Next we used the 2% pre-mixed solution of detergent and ammonia. The majority of soil was removed with just the application of the water. This soap solution also removed soil which was visibility apparent. At this point I concentrated on trying to remove lichen growth. The water had softened it and I used the wooden sticks to work in heavily affected areas on the top edge of the stone.I then used D2 on just half of the back of the stone per Franks instruction. Our general feeling was that the only visible difference could be due to extra scrubbing and not the cleaning agent(D2).My stone, even after some drying was not as clean as those around me so late that afternoon I applied a poltice of paper mache and a 2% solution that had been premixed and honestly since I didn't mix it I'm not sure of the formula. I completely covered the stone and it was left over night. Sunday morning the poultice was removed and the marker was fully rinsed clean..
CemPlotID: 33 Rhodes, Sophia W.
10/8/2004 10/10/2004
Supervising Conservator: Frank G. Matero Conservator: Abigail Merlis
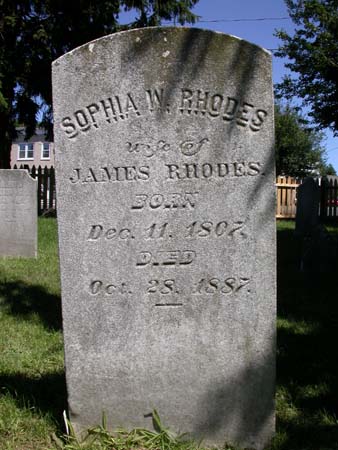
Treatment Report:Condition: The headstone’s surface was covered with a thin compact layer of biomaterial (lichens, mold) compounded by accumulated dirt. The surface was dark in appearance and the epitaph/inscription was difficult to discern. Treatment: Surfaces were pre-wet with standard tap water via hose, followed by a light mechanical removal of superficial accumulations (biological growth/ inorganic accretions) with a natural bristle brush. The loose material was well flushed using a hose. 15 min. The headstone was then cleaned with a 1:1 mixture of detergent and water with ammonia (~2%) using a natural bristle brush. At this point, the surface always remained moist in order to insure proper cleaning. After both sides were cleaned, the headstone was flushed with water via hose. 15 -20 min. No other treatment was done on this headstone.
CemPlotID: 34 Sayre, Sarah W.
10/8/2004 10/10/2004
Supervising Conservator: Frank G. Matero Conservator: Sarah Cleary
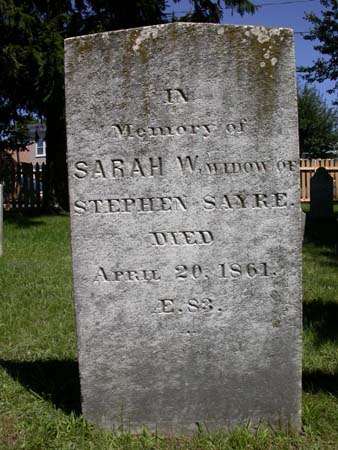
Condition:
Treatment Report:The headstone’s surface was covered with a thin compact layer of biomaterial (lichens, mold) compounded by accumulated dirt. The surface was dark in appearance and the epitaph/inscription was difficult to discern. Treatment: Surfaces were pre-wet with standard tap water via hose, followed by a light mechanical removal of superficial accumulations (biological growth/ inorganic accretions) with a natural bristle brush. The loose material was well flushed using a hose. 15 min. The headstone was then cleaned with a 1:1 mixture of detergent and water with ammonia (~2%) using a natural bristle brush. At this point, the surface always remained moist in order to insure proper cleaning. After both sides were cleaned, the headstone was flushed with water via hose. 15 -20 min. No other treatment was done on this headstone.
CemPlotID: 35 Sayre, Stephen
10/8/2004 10/10/2004
Supervising Conservator: Frank G. Matero Conservator: Andrew Fearon
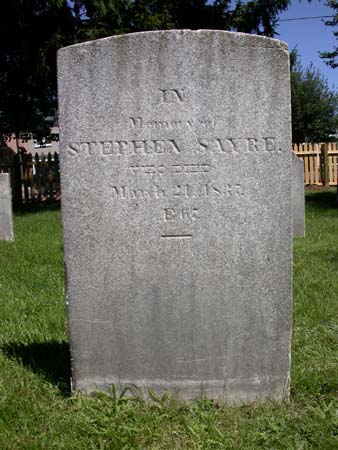
Treatment Report:
Condition: Surface of the headstone was covered with a fine film of bio-material (lichens, mold) compounded by accumulated dirt. Surfaces were dark in appearance and epitaph/inscription difficult to discern. Treatment executed: Surfaces were pre-wet with standard tap water via hose, followed by a light mechanical removal of superficial accumulations (biological growth/ inorganic accretions) with a natural bristle brush. After loose material was well flushed with hose, an application of detergent and ammonia (~2%) was applied to remove any remaining extant accumulations then cleared with water. On verso a test section of D2 ,a biocide agent (~33% in water), was applied for 5 minutes then flushed with water. A poultice of paper pulp was mixed with a mild solution of pool bleach (OCl) and applied to front section, and left to dwell for 24 hours then removed mechanically with plastic spatula then well flushed with water. The D2 show only marginal improvement on the reverse surface and was not continued.
CemPlotID: 36 Sayre, Mehetable
10/8/2004 10/10/2004
Supervising Conservator: Frank G. Matero Conservator: Han Salzman
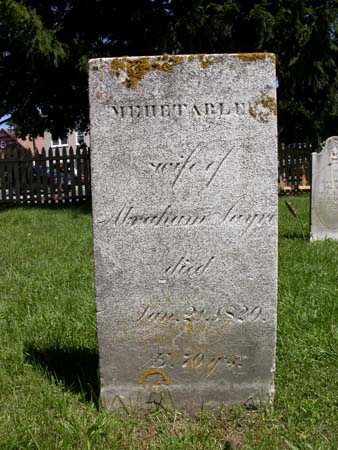
Treatment Report:The marble was first rinsed with water and cleaned with a soft natural bristle brush, starting from bottom up to loosen the bio-growth and remove any superficial soiling. Small wooden sticks were used to remove bio-growth in the recessed surfaces. The stones were rinsed and then cleaned with D2 (2 parts water: 1 part D2) using a soft bristle, starting from the bottom up. The surface was again rinse with water to remove any residue. The cleaning worked fairly well in removing the surface bio-growth and soiling. There were still areas of mold on the surface and some green staining due to bio-growth still visible. The backs of the primary marker and the foot stone were not totally accessible for cleaning due to their positions.
CemPlotID: 113 Smith, Nathanael
10/8/2004 10/10/2004
Supervising Conservator:Frank G. Matero Conservator: John Glavin, Amanda Thomas
Treatment Report: Pretreatment condition: Delamination of inscription at top and bottom of marker with loss in between areas of delamination. Summary of treatment: The marker was treated on October 9, 2004 with injection grout. The grout consisted of a dry mix of one part fine silica sand less than 300.m in size, one part Zeelan 3M ceramic microspheres and two parts Riverton hydrated hydraulic lime. This was then mixed with one part dry to one part 10% solution El Rey Superior 200 in water from tap on site. The voids were then injected with water to pre-wet the interior surfaces and followed thereafter with an injection of 10% solution El Rey and grout. The injection was done through a 10 gauge steel cannula. The top portion of the marker required five holes drilled for syringe access to the voids. The top of the delamination at the bottom of the marker was easily accessible with the syringe. The access areas were then filled with a mortar patch consisting of one part grey Portland cement to three parts Type S lime. This was mixed one part binder mixture with three parts George Kempf brown bar sand sieved through screen #30. To pigment the mixture 32 parts binder/sand mixture were mixed with 2 parts burnt umber, 0.2 parts van dyck, and 0.1 parts brownstone by weight. All three pigments were manufactured by Rainbow masonry pigments.
CemPlotID: 96 Rhodes, Frances
10/2/2004 10/10/2004
Supervising Conservator: Frank G. Matero Conservator: Brendan Beier
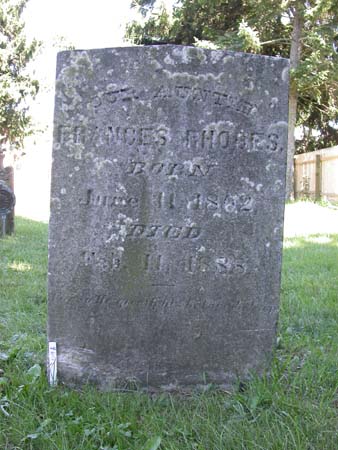
Treatment Report: The marble was first rinsed with water and cleaned with a soft natural bristle brush, starting from bottom up to loosen the bio-growth and remove any superficial soiling. Small wooden sticks were used to remove bio-growth in the recessed surfaces. The stones were rinsed and then cleaned with D2 (2 parts water: 1 part D2) using a soft bristle, starting from the bottom up. The surface was again rinse with water to remove any residue. The cleaning worked fairly well in removing the surface bio-growth and soiling. There were still areas of mold on the surface and some green staining due to bio-growth still visible. The backs of the primary marker and the foot stone were not totally accessible for cleaning due to their positions.
CemPlotID: 97 Rhodes, Robert R.
10/2/2004 10/10/2004
Supervising Conservator: Frank G. Matero Conservator:Julie Donofrio
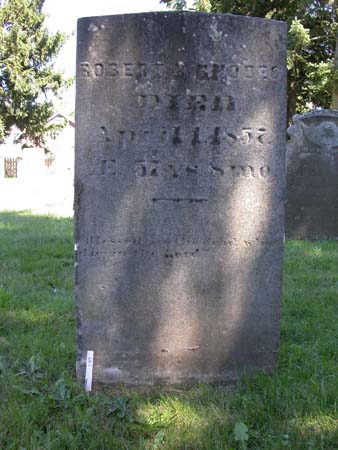
Treatment Report: The marble was first rinsed with water and cleaned with a soft natural bristle brush, starting from bottom up to loosen the bio-growth and remove any superficial soiling. Small wooden sticks were used to remove bio-growth in the recessed surfaces. The stones were rinsed and then cleaned with D2 (2 parts water: 1 part D2) using a soft bristle, starting from the bottom up. The surface was again rinse with water to remove any residue. The cleaning worked fairly well in removing the surface bio-growth and soiling. There were still areas of mold on the surface and some green staining due to bio-growth still visible. The backs of the primary marker and the foot stone were not totally accessible for cleaning due to their positions.
CemPlotID: 98 White, Ann (____)
10/2/2004 10/10/2004 Supervising Conservator: Frank G. Matero Conservator:Mary Grilli
Treatment Report:The marble was first rinsed with water and cleaned with a soft natural bristle brush, starting from bottom up to loosen the bio-growth and remove any superficial soiling. Small wooden sticks were used to remove bio-growth in the recessed surfaces. The stones were rinsed and then cleaned with D2 (2 parts water: 1 part D2) using a soft bristle, starting from the bottom up. The surface was again rinse with water to remove any residue. The cleaning worked fairly well in removing the surface bio-growth and soiling. There were still areas of mold on the surface and some green staining due to bio-growth still visible. The backs of the primary marker and the foot stone were not totally accessible for cleaning due to their positions.
CemPlotID: 119 Cooper, Abraham
10/2/2004 10/10/2004
Supervising Conservator: Frank G. Matero Conservator: Sarah Shotwell
Treatment Report: The slate was first rinsed with water and cleaned with a soft natural bristle brush, starting from bottom up to loosen the bio-growth and remove any superficial soiling. Small wooden sticks were used to remove bio-growth in the recessed surfaces. The stones were rinsed and then cleaned with D2 (2 parts water: 1 part D2) using a soft bristle, starting from the bottom up. The surface was again rinse with water to remove any residue. Half of the stone was poulticed overnight and more biogrowth was able to be removed.
CemPlotID: 55 Pelletreau, Sary
8/15/2005 8/30/2005
Supervising Conservator: Frank G. Matero Conservator: Jennifer Correia
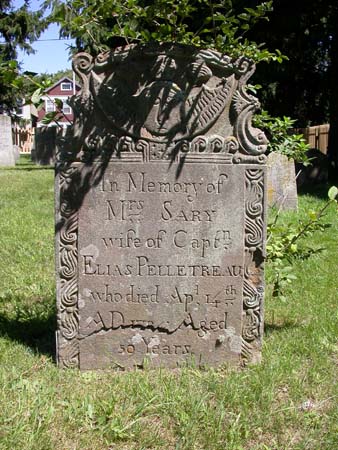
Treatment Report:Integrity of the stone was high, as most of the original carved surface was in tact, but unstable. Most of the carved surface of the marker was blindly delaminating (or delaminating?) at the bedding planes in the stone. 21 holes were drilled into the stone surface, and two of these holes were carved in the decorative death head at top. All detached areas were cleaned with a metal microspatula and compressed air to remove debris. The areas were then flushed with water using a 30 mL plastic syringe, and cotton was packed into areas of delamination. The stone was filled through the drilled holes and areas of detachment on the right side and across the lower area of the stone. The stone was filled with 470 cc of grout injected with a 10 gauge steel cannula attached to a 30mL plastic syringe (in smaller areas a 12 gauge steel cannula was substituted for the 10 gauge). The grout was given 48 hours to settle and solidify. The marker was then cleaned with water and a 50% ammonia (industrial strength is 10% ammonia) solution in water. Wooden tools and a suede copper brush were used to remove biogrowth. The stone was then patched with a mortar fill earlier specified. A tree was removed from behind the stone. After the mortar dried for a period of one week, the stone was brushed with a 10% acetic acid in water for a dwell time of three minutes. The stone was rinsed thoroughly with water as a final treatment step.
CemPlotID: 62 Howard, Silas, Eq.
8/15/2005 8/30/2005
Supervising Conservator: Frank G. Matero Conservator:Lyles McBratney
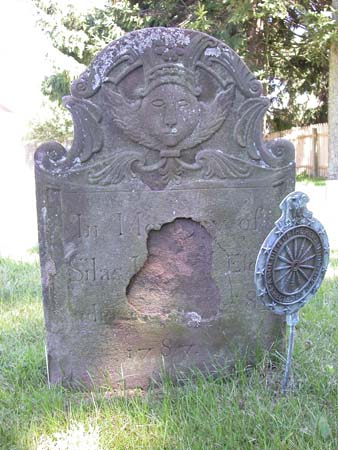
Treatment Report:The headstone had large areas of delaminating surfaces across the entire front of the headstone with major loss already recorded. The headstone was prepared for grouting by removing debris from voids using micro spatulas, compressed air, and water. All openings were then dammed with dense cotton rolls. A grout formulation (earlier specified), was then injected using 30 mL syringes through a 12 gauge needle. After the initial grout injections were completed other voids were detected by taping the surface. The majority of voids were accessible from openings caused by the major loss in the center of the stones face and through small cracks. The face of the death head was also detached and two small holes were drilled through the nostrils of the face. A 1/8th inch masonry bit was used to access these areas, and a total of 16 holes were drilled. The wings were also detached and will eventually require pinning. This process required a total of 12 hours of work. After grouting was completed and allowed to cure for a minimum of 24 hours, the stone was cleaned using a solution of 1 part industrial grade ammonia (10% ammonium hydroxide) to 1 part tap water. The stone was kept wet and ammonia solution applied with a spray bottle. Lichens and moss were first removed mechanically with wood tools. Any residual biogrowth was then scrubbed with toothbrushes, stencil brushes followed by the use of a brass bristled suede brush. One small fragment was collected from the headstone and was re-attached using Sikadur 31 concrete epoxy. Mortar was prepared as described earlier and capped areas filled with grout and other cracks on the stones surface. After the mortar dried for a period of two days, the stone was brushed with a solution of 10% acetic acid in water for a dwell time of three minutes. The stone was rinsed thoroughly with water as a final treatment step. The footstone was excavated from its location directly against the back of the headstone and was reburied at a distance of 72 inches east of the headstone.
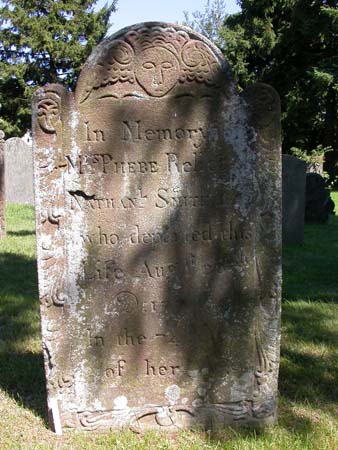
CemPlotID: 99 White, Phebe
8/15/2005 8/30/2005
Supervising Conservator: Frank G. Matero Conservator: Cynthia Silva
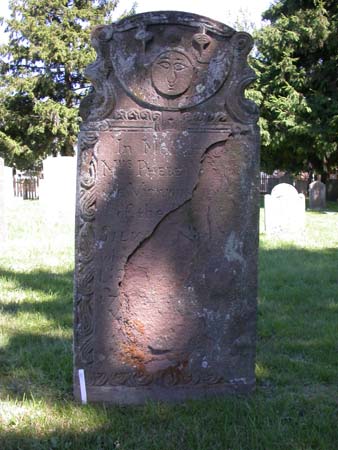
Treatment Report:The headstone was prepared for grouting by removing debris from voids using micro spatulas, compressed air, and water. All openings were then dammed with dense cotton rolls. A grout formulation (earlier specified), was then injected using 30 mL syringes through a 12 gauge needle. After the initial grout application was competed through available openings it was determined that areas with blind voids required further injections through drilled holes. A 1/8th inch masonry bit was used to access these areas, and a total of 16 holes were drilled. 525 cc’s of grout was injected to stabilize the detached brownstone. This process required a total of 12 hours of work. After grouting was completed and allowed to cure for a minimum of 24 hours, the stone was cleaned using a solution of 1 part industrial grade ammonia (10% ammonium hydroxide) to 1 part tap water. The stone was kept wet and ammonia solution applied with a spray bottle. Lichens and moss were first removed mechanically with wood tools. Any residual biogrowth was then scrubbed with toothbrushes, stencil brushes followed by the use of a brass bristled suede brush. In addition, flaking and detaching stone was scaled from parent stone, (using a small chisel and hammer), only in areas where the original carved surface had already been lost. This cleaning process took approximately 5 hours. Two small fragments collected from the Headstone and were re-attached using Sikadur 31 concrete epoxy. All openings were capped using the following pigmented mortar mix described in the formulations section. Mortar fills took approximately 6 hours. After the mortar dried for one week, the marker was brushed with a solution of 10% acetic acid in tap water. After a dwell time of two minutes the stone was rinsed with water. The footstone was excavated from its location directly against the back of the headstone and was reburied at a distance of 72 inches east of the headstone. Note: Stone 99 is part of a pair of headstones with number 100? Both are thought to have been quarried together and carved at the same time. Number 99 commemorates Phebe White, though identical in carved motifs, is diminutive in scale as compared to her husband’s headstone. Stone 99 is carved from inferior sandstone resulting in a marked difference between the two stones in terms of stone detachment and loss.
CemPlotID: 100 White, Silvanus (Rev)
8/15/2005 8/30/2005
Supervising Conservator: Frank G. Matero Conservator: Lyles McBratney
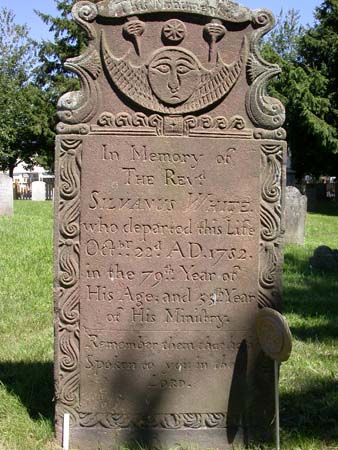
Treatment Report:The marker did not require stabilization and only required cleaning. The marker was chosen as it is the footstone to adjacent marker 99. The stone was cleaned with the ammonia solution and the footstone was excavated and reburied. Upon excavation it was noted that the footstone required stabilization. Approximately 50cc of grout were filled into the face of the footsone. The grout was given 24 hours to settle before the stone was cleaned. The marker was then filled with the mortar mix, which was allowed to dry for 48 hours. The footstone was then brushed with a solution of 10% glacial acetic acid in water. The acid was allowed to dwell for three minutes. The stone was then rinsed with tap water. The stone was reburied 72 inches east of the headstone.
CemPlotID: 107 Jagger, Samuel Junior
8/15/2005 8/30/2005
Supervising Conservator: Frank G. Matero Conservator: J. Correia, C. Silva
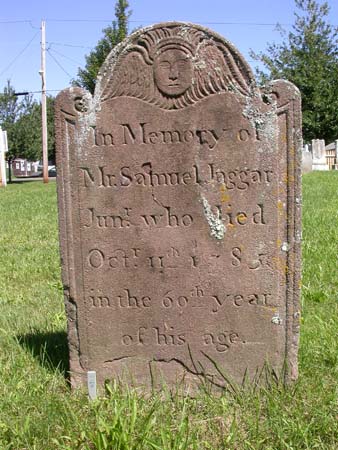
Treatment Report:he carved surface had areas of blind delamination and areas of loss. Some of the areas of loss were surrounded by fragile stone. All detached areas were cleaned with a metal microspatula and compressed air to remove debris. The areas were then flushed with water using a 30 mL plastic syringe. Cotton was packed in areas of delamination before grouting. After the initial grout application was competed through available openings it was determined that areas with blind voids required further injections through drilled holes. A 1/8th inch masonry bit was used to access these areas, and a total of 11 holes were drilled. 210 cc’s of grout was injected to stabilize the detached brownstone. This process required a total of 6 hours. A 10 gauge steel cannula attached to a 30mL plastic syringe was used for injection (in smaller areas a 12 gauge steel cannula was substituted for the 10 gauge). While cleaning, a fragile area was noted in the center of the stone and filled with 20 cc of grout. One small fragment collected from the marker was re-attached using Sikadur 31 concrete epoxy. The grout was allowed 24 hours to settle before cleaning could recommence. The marker was then cleaned with a solution containing 1 part industrial grade ammonia (10% ammonium hydroxide) to 1 part tap water. The stone was kept wet and ammonia solution applied with a spray bottle. Lichens and moss were first removed mechanically with wood tools. Any residual biogrowth was then scrubbed with toothbrushes, stencil brushes followed by the use of a brass bristled suede brush. In addition, flaking and detaching stone was scaled from parent stone, (using a small chisel and hammer), only in areas where the original carved surface had already been lost. Mortar was prepared as described earlier and capped areas filled with grout and other cracks on the stone. After the mortar dried for a period of two days, the stone was brushed with a solution of 10% glacial acetic acid in water for a dwell time of three minutes. The stone was rinsed thoroughly with water as a final treatment step.
CemPlotID: 108 Illegible
8/15/2005 8/30/2005
Supervising Conservator: Frank G. Matero Conservator: Lyles McBratney
Treatment Report: The headstone had large areas of delaminating surfaces across the entire front of the headstone with major loss already recorded. The headstone was prepared for grouting by removing debris from voids using micro spatulas, compressed air, and water. During this process a portion of the lower left of the face detached. The fragments were very friable but were saved for reattachment. All openings were then dammed with dense cotton rolls. A grout formulation (earlier specified), was then injected using 30 mL syringes through a 12 gauge needle. After the initial grout injections were completed other voids were detected by taping the surface. The voids were accessible from openings caused by the loss and cracks across the face of the stone. In addition to these openings, 15 holes were drilled in through the surface of the stone to access voids. A 1/8th inch masonry bit was used to access these areas, and a total of 16 holes were drilled. The wings were also detached and will eventually require pinning. This process required a total of 12 hours of work. After grouting was completed and allowed to cure for a minimum of 24 hours, the stone was cleaned using a solution of 1 part industrial grade ammonia (10% ammonium hydroxide) to 1 part tap water. The stone was kept wet and ammonia solution applied with a spray bottle. Lichens and moss were first removed mechanically with wood tools. Any residual biogrowth was then scrubbed with toothbrushes, stencil brushes followed by the use of a brass bristled suede brush. The small fragments collected from the headstone were re-attached using Sikadur 31 concrete epoxy. Mortar was prepared as described earlier and capped areas filled with grout and other cracks on the stone. After the mortar dried for a period of two days, the stone was brushed with a solution of 10% glacial acetic acid in water for a dwell time of three minutes. The stone was rinsed thoroughly with water as a final treatment step.
CemPlotID: 111 Smith, Phebe
8/15/2005 8/30/2005
Supervising Conservator: Frank G. Matero Conservator: Jennifer Correia
Treatment Report: Integrity of the stone was high, as most of the original carved surface was in tact, but unstable. Most of the carved surface of the marker was blindly delaminating at a bedding plane in the stone. 11 holes were drilled into the front surface of the stone using a 1/8 inch masonry bit. All detached areas were cleaned with a metal microspatula and compressed air to remove debris. The areas were then flushed with water using a 30 mL plastic syringe. Areas of delamination were packed with cotton. The stone was filled through the drilled holes and three areas of detachment on the left side of the stone. The stone was filled with 165 cc of grout injected with a 10 gauge steel cannula attached to a 30mL plastic syringe in the face of the stone. The areas of delamination on the left side were filled with 35 cc of grout, a large portion of this amount was used in the uppermost area of delamination. The uppermost delaminating area on the left side of the stone was very fragile and some pieces detached when the packed cotton was removed. The area was only partially stabilized through grouting. The detached areas (total six pieces) were reapplied with Sikadur 31 epoxy paste. The marker was then cleaned with solution of 1 part water and one part ammonia (industrial strength). Wooden tools and a suede copper brush were used to remove biogrowth. The stone was then patched with a mortar fill. A tree was removed from behind the stone. After the mortar dried for a period of one week, the stone was brushed with a 10% acetic acid in water for a dwell time of three minutes. The stone was rinsed thoroughly with water as a final treatment step.
CemPlotID: 113 Smith, Nathanael
8/15/2005 8/30/2005
Supervising Conservator: Frank G. Matero Conservator: J. Correia, L. McBratney
Treatment Report:The stone was grouted, cleaned and filled with mortar. This year hollow areas were noticed when the last year’s treatment was reassessed. These areas of blind delamination were treated in this phase. Holes were drilled to inject grout into the stone. All detached areas were cleaned with a metal microspatula and compressed air to remove debris. The areas were then flushed with water using a 30 mL plastic syringe. Areas of delamination were packed with cotton. The stone was filled grout injected with a 10 gauge steel cannula attached to a 30mL plastic syringe in the face of the stone. The back of the marker required 60cc of grout to stabilize the delaminating sandstone. The marker was then cleaned with a solution of one part ammonia (industrial strength) and one part water. Wooden tools and a copper brush were used to remove biogrowth. The stone was then patched with a mortar fill. After the mortar dried for a period of two days, the stone was brushed with a solution of 10% glacial acetic acid in water for a dwell time of three minutes. The stone was rinsed thoroughly with water as a final treatment step. The footstone was excavated and reburied 72 inches east of the headstone.
CemPlotID: 135 Cooper, Elias, Esq.
8/15/2005 8/30/2005
Supervising Conservator: Frank G. Matero Conservator:Jennifer Correia
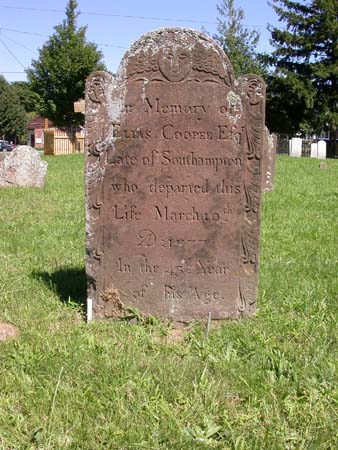
Treatment Report:Two areas of delamination were noted. An area of blind delamination was noted in the lower right area of the stone and a larger delaminating area was noted on the left side of the stone. 7 holes were drilled into the stone on the carved surface of the stone, and two of these holes were carved in the lower right area. All detached areas were cleaned with a metal microspatula and compressed air to remove dirt and debris. The areas were then flushed with water using a 30 mL plastic syringe. The stone was filled with 75 cc of grout injected with a 10 gauge steel cannula attached to a 30mL plastic syringe (in smaller areas a 12 gauge steel cannula was substituted for the 10 gauge). Delamination was also noted on the back of the stone and was filled with 60 cc of grout. Two holes were drilled in the back of the stone. Cotton was packed in to delaminating areas before grout was injected. After the grout settled for 48 hours the marker was cleaned. The marker was then cleaned with a solution of one part water and one part ammonia (industrial strength). Wooden tools and a suede copper brush were used to remove biogrowth. Cracks and grouted areas were then patched with a mortar fill. After the mortar dried for a period of one week, the stone was brushed with a solution of 10% glacial acetic acid in water for a dwell time of three minutes. The stone was rinsed thoroughly with water as a final treatment step. Prepared by: Architectural Conservation Laboratory and Research Center Page 15 of 15 University of Pennsylvania, 2006 �